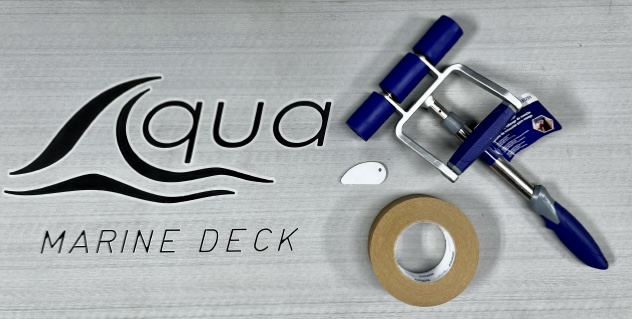
Installation Kit – DIY Boat Flooring Install Tools for EVA Foam Decking installations
$108.95
Product Title:
EVA Foam Decking Installation Kit – DIY Boat Flooring Install Tools
Product Description:
Install your EVA foam boat decking with confidence using the Aqua Marine Deck Installation Kit. It puts the tools and supplies you need in one place, so you can prep your surface, promote a strong bond and lay down a clean, professional-looking deck yourself. Works on gelcoat, fiberglass, aluminum, and painted surfaces.
A good install starts with good prep. The kit helps you clean the surface, prime high-wear areas and press the decking firmly into place. That keeps edges and corners from lifting and helps your decking hold up to sun, water and foot traffic for years.
It works with our custom-cut decking kits, full sheet EVA foam, cooler pads, dash pads, helm pads and coaming bolsters. Whether you’re doing your whole deck or one swim platform, it saves you from hunting down supplies and helps you get it right the first time.
What’s Included:
- Adhesion promoter / primer for a stronger bond with paint brush
- Roller (allows the decking to adhere as 14lbs of pressure is needed with the PSA)
- Tape
- Slicer/cutter
- Step-by-step installation instructions
Features:
- Complete DIY installation kit for EVA foam marine decking
- Helps prevent edges and corners from lifting or peeling
- Strengthens the adhesive bond on fiberglass, gelcoat and aluminum
- Saves time with all your install supplies in one kit
- Works with custom decking kits, full sheets, cooler pads and dash pads
- Professional-looking results without a professional installer
Installation Tips:
- Clean the surface thoroughly to remove wax, dirt and oils, then let it dry completely.
- Dry-fit all decking pieces before peeling the backing.
- Apply primer to edges, corners and high-traffic areas, and let it dry according to the label.
- Peel the backing a little at a time, positioning as you go.
- Use the roller or squeegee to press the decking firmly into place.
- Avoid heavy use for 24 hours so the adhesive can fully cure.
